
While my husband wanted to avoid gender-typing our daughter before she has even exited my womb, he is a good sport and has let me splash the nursery with bits of pink here and there. (Wait, I heard “real men wear pink,” or some other saying like that.)
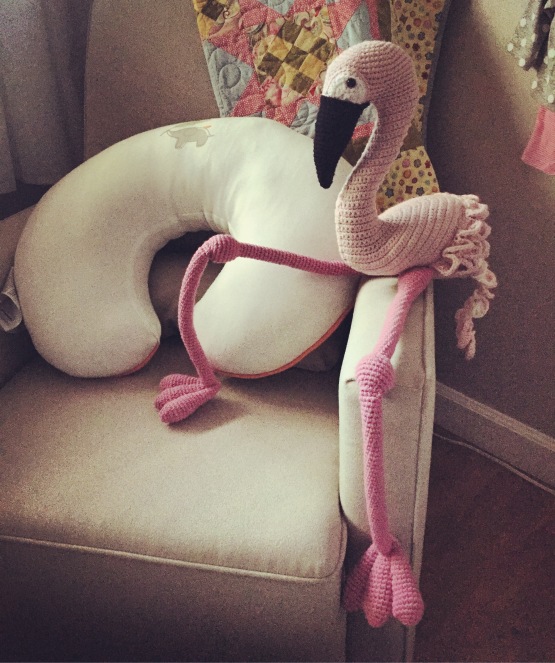
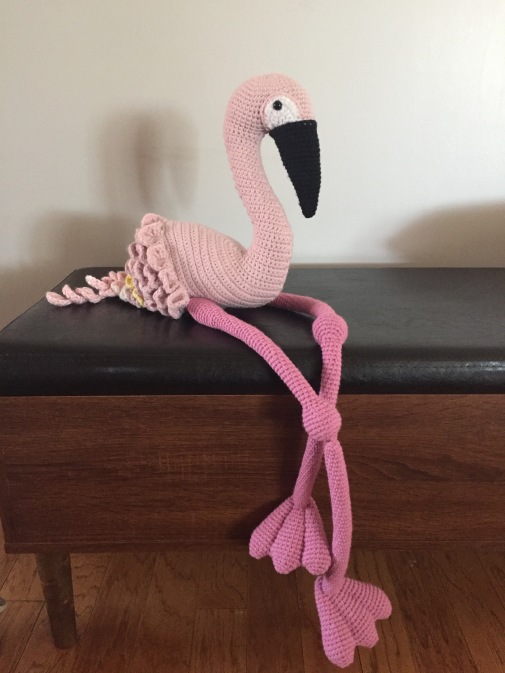
I wanted to make our daughter her own stuffed animal, and a flamingo seemed so fitting. I loved flamingos in elementary school, and they seem like such whimsical, fun creatures to feature as part of a nursery.
I started designing a flamingo plushie in the style of my other original creations; however, my original design was “put on the back-burner” when I came across Vanessa Mooncie’s flamingo pattern from her book Crocheted Wild Animals, which I purchased from Amazon. She is larger than the average plushie, and I knew I had to make her!
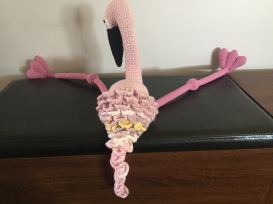
The overall directions are fairly straightforward, but there are portions that are a bit more involved and complicated, especially when constructing the feathers. There were also portions of the directions that (I feel) could have been written with more clarity, and other sections seemed to have editing errors because simple directions were omitted (such as turning at the beginning/end of a row).
I tried Googling some tips on the pattern when I got stumped (to no avail), so I thought I would share insight into the specific directions that I struggled with, and also provide a few pointers.
- In round 16 of the head (“Divide for Beak”), you are basically cutting the head in half so that half of the stitches will form a circle for the beak, and the other half will start forming the rows for the neck. When the directions state “sc in next 12, turn and work 1 sc in the opposite 12 sc,” that means the two sections of 12 sc together will equal 24 stitches. It is almost as if you are re-joining in the middle of the head to divide the two sides into the beak portion and the neck portion.

- Upper legs: When the directions at the end state to “work 1 sc in each st until upper leg measures 6.5 in. excluding knees, I crocheted up to 46 rounds to equal that length.
- For the lower legs, the last directions similarly state to continue working until the lower leg measures 8 inches, which was 45 rounds for me.
- When working the entirety of the feathers, you will want to turn your work at the end of each row. For some reason, the book does not state this which confused me more than it probably should have.
- Instead of making the eyes out of french knots, I fastened 10mm safety eyes through the eyes patches and onto to the head before proceeding to sew the eyes or neck closed.
If you came across this page after being stumped by this pattern, good luck! Hopefully I was able to assist! Happy crocheting.


I think of Alice in Wonderland when holding her.


Hi hun how did u get on with the neck where it stays turn at the end of every row are you ment to sl St in then turn or leave a gap for sewing I have considered just continuing in rounds
LikeLike
You would ch st then turn and crochet to the end, then do it again when you reach the other side. You will end up with two long sides that you will stitch closed together. Hope that answers your question.
LikeLike
I don’t think you can continue in the round because the neck eventually starts forming a shape.
LikeLike
I’m absolutely stumped by the feathers. I cannot figure out what it wants me to do. Are you able to help me? I’m finding the way the pattern is written is incredibly challenging.
LikeLike
Hi Jamie, I found the pattern to be pretty challenging too, and it took me several attempts to get it. I’m away from home at the moment but I’ll take a look and try to help when I can.
LikeLike
Try looking up some videos on crocodile stitch. There are some really good ones on youtube that helped me figure it out 🙂
LikeLike
Do you still need help on the feathers?
LikeLike
I gave up on it in the end. I could not work it out and instead of pulling my hair out I just did rows of crocodile stitch. I feel like the end result was still beautiful and I kept my sanity. Thank you for being willing to help though.
LikeLike
Ok I’m glad you worked around it!
LikeLike
Hi all, unfortunately I’ve only come across this page when I’ve almost finished my flamingo – it would have been very helpful a couple of weeks ago! Yes, the feathers nearly defeated me. They only started to make sense when I re-read the instruction to “work DOWN the first treble” – I realised that you are supposed to effectively turn the work 90 degrees clockwise, and work the first set of increasing treble stitches (tr, dtr, ttr) down the post of the first treble, then rotate 180 degrees anti-clockwise, and work the set of decreasing treble stitches (ttr, dtr, tr) up the second treble post, directly opposite the first set (getting that first ttr stitch in is really tricky). Once you’ve got the feathers sorted out, the rest is straightforward – alternating a foundation row of sets of two trebles with a row of feathers.Every time I follow a pattern by Vanessa Mooncie, I am blown away by her creativity – but maybe we could help her out by offering to road test the instructions in her next book!
LikeLike
I haven’t tried her other patterns yet, but that’s a good thought! Thank you for sharing the tip for the feathers! It will come in handy for the next person who inevitably gets stumped!
LikeLike
Thanks – you’re a life saver!
LikeLiked by 1 person
Hello, how does your neck stay up without falling to the sides? I stuffed mine firmly but it still falls down to the sides. Did you put anything inside other than the stuffing?
LikeLike
Hi! I only stuffed it very tightly with stuffing and it has stayed up well. I also tend to make my stitches very very tight. You could try experimenting with some pipe cleaners or a piece of styrofoam from the craft store?
I hope it works out!
LikeLike